如果你的 App 使用了第三方登入(如 Google、Facebook),根據 Apple 的規定,還必須提供「Sign in with Apple」選項,否則可能無法通過 App Store 審核。
在我們實作「Sign in with Apple」之前,會先了解它到底是什麼、為什麼需要它,再一步步把它加進 Flutter App 裡。至於後端驗證的部分我們直接交給 Firebase Authentication 處理,不用自己寫後端。
什麼是 Sign in with Apple?
Sign in with Apple 是 Apple 在 2019 年 WWDC 推出的身份驗證機制,讓使用者可以用 Apple ID 快速登入第三方 App 或網站,不需要記住密碼。它有以下幾個主要特點:
- 隱私保護:使用者可以選擇隱藏真實 Email,Apple 會產生一組隨機的中繼 Email 地址轉發信件。
- 安全性高:支援 Face ID / Touch ID 生物辨識驗證。
- 跨平台支援:除了 iOS,也支援 Android、Web 等平台(透過 OAuth 2.0 流程)。
前置準備
開發環境需求
- Flutter 3.0 以上
- Xcode 14 以上(iOS 開發)
- 有效的 Apple Developer 帳號(需付費,每年 $99 美金)
- Android Studio 或 VS Code
開發環境準備就緒後,我們就要分別到 Apple 和 Firebase 後台進行設定,可以先開啟 Apple Developer 和 Firebase Console 做準備。
Firebase Console 設定 Apple Sign-In
Apple Developer 後台設定完成後,接著要到 Firebase Console 啟用 Apple 作為登入 Provider,並填入剛才取得的金鑰資訊。Firebase 會利用這些資訊向 Apple 驗證使用者的 token,你不需要自己建立後端驗證邏輯。
步驟 1:啟用 Apple 登入 Provider
- 前往 Firebase Console
- 選擇你的專案
- 左側選單點擊「Authentication」
- 點擊「登入方式」頁籤
- 點擊「新增供應商」
- 找到「Apple」並點擊開啟
步驟 2:填入金鑰資訊
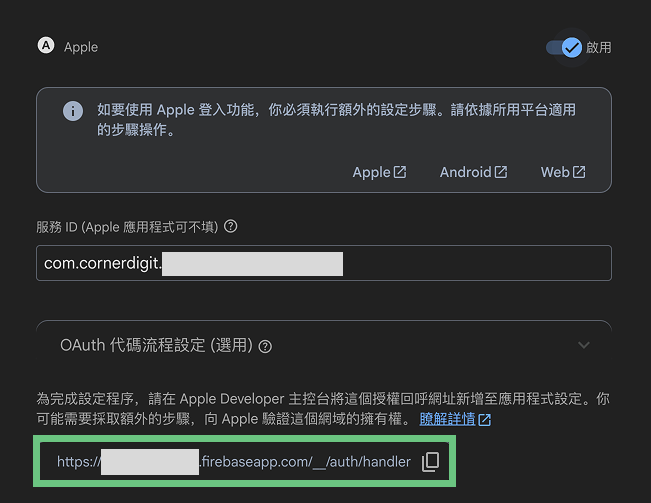
開啟後,打開「OAuth 代碼流程設定(選用)」區塊,此區塊的內容需要從 Apple Developer 後台設定後填入,我們先初步了解每個欄位需要填入什麼內容:
- 服務ID:在 Apple Developer 建立的 Service ID 識別碼(如 com.yourcompany.yourapp.service)。
iOS 原生登入不需要此欄位,但 Android 透過 Web OAuth 流程時必填。 - Apple 團隊 ID:10 位英數字元,可在 Apple Developer 右上角帳號名稱下方,或 Membership 頁面中找到。
- 金鑰 ID:建立 .p8 金鑰時產生的 ID(10 位字元),可在 Apple Developer Keys 頁面找到。
- Private Key(.p8 內容):開啟由 Apple Developer 後台下載的 .p8 檔案,將完整內容(包含 -----BEGIN PRIVATE KEY----- 與 -----END PRIVATE KEY-----)貼入此欄位。
接著開啟 Apple Developer 後台,我們依序取得 Firebase 所需要的內容。
Apple Developer 後台設定
步驟 1:開啟 App ID 的 Sign In with Apple Capability
- 前往 Apple Developer
- Certificates, Identifiers & Profiles Identifiers
- 選擇你的 App ID
- 勾選「Sign In with Apple」並儲存

步驟 2:建立 Service ID(Android / Web 用)
- 在 Identifiers 頁面點擊「+」新增
- 選擇「Services IDs」
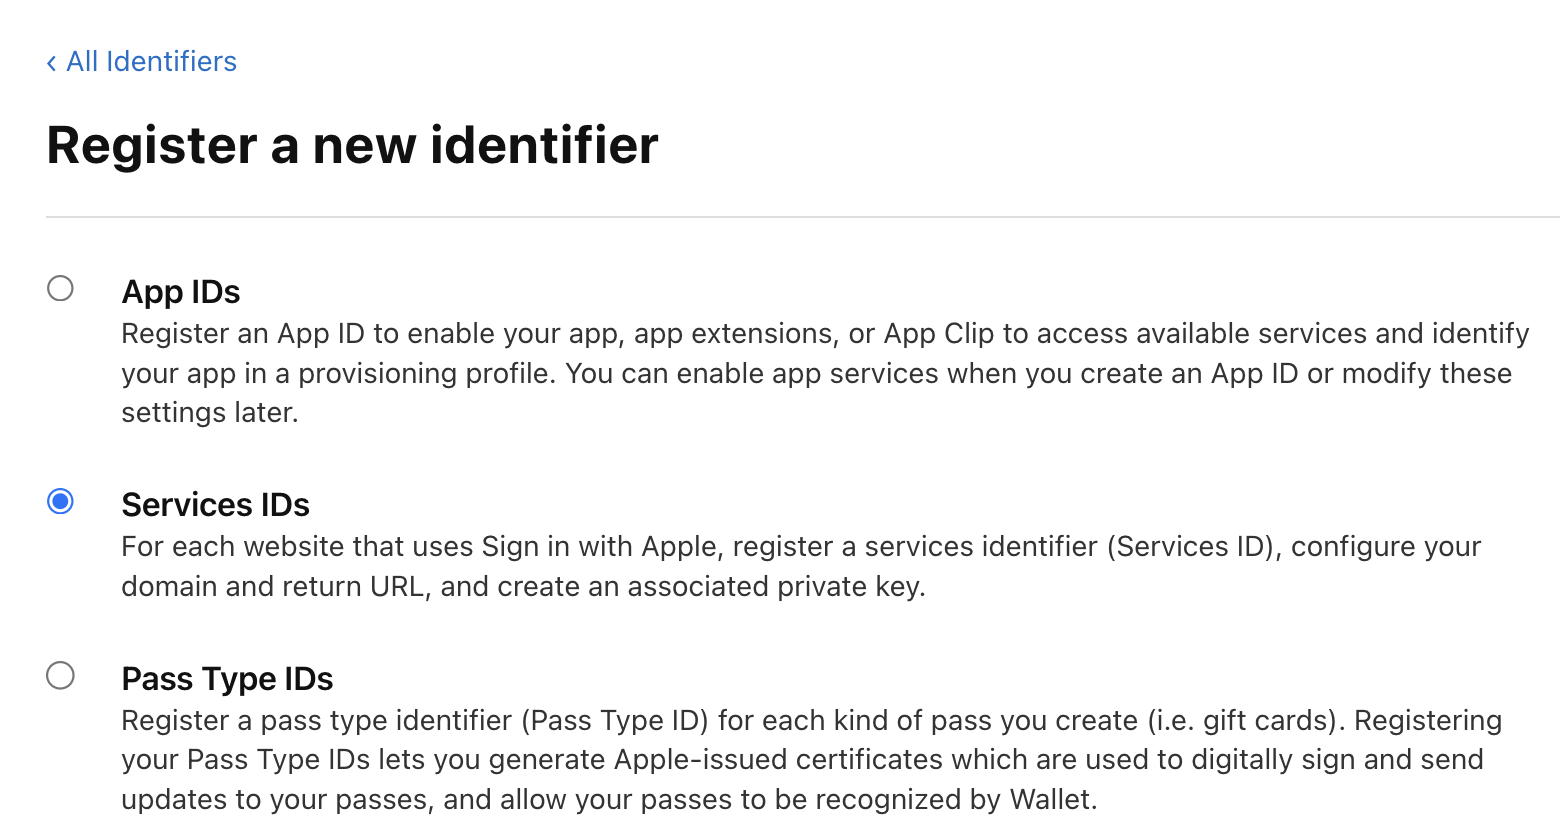
- 填入描述與識別碼(如 com.yourcompany.yourapp.service)
- 啟用「Sign In with Apple」
- 複製在 Firebase Authentication 的 「登入方式」 頁籤中,選擇「Apple」會顯示一組 Authorized redirect URI,格式如下:
- 回到 Apple 後台設定 Domains and Subdomains 以及 Return URLs(Redirect URI),這是 Apple 登入完成後回傳授權碼的位址。Domain 欄位填入 <your-project-id>.firebaseapp.com,Return URL 填入完整的 handler 網址。
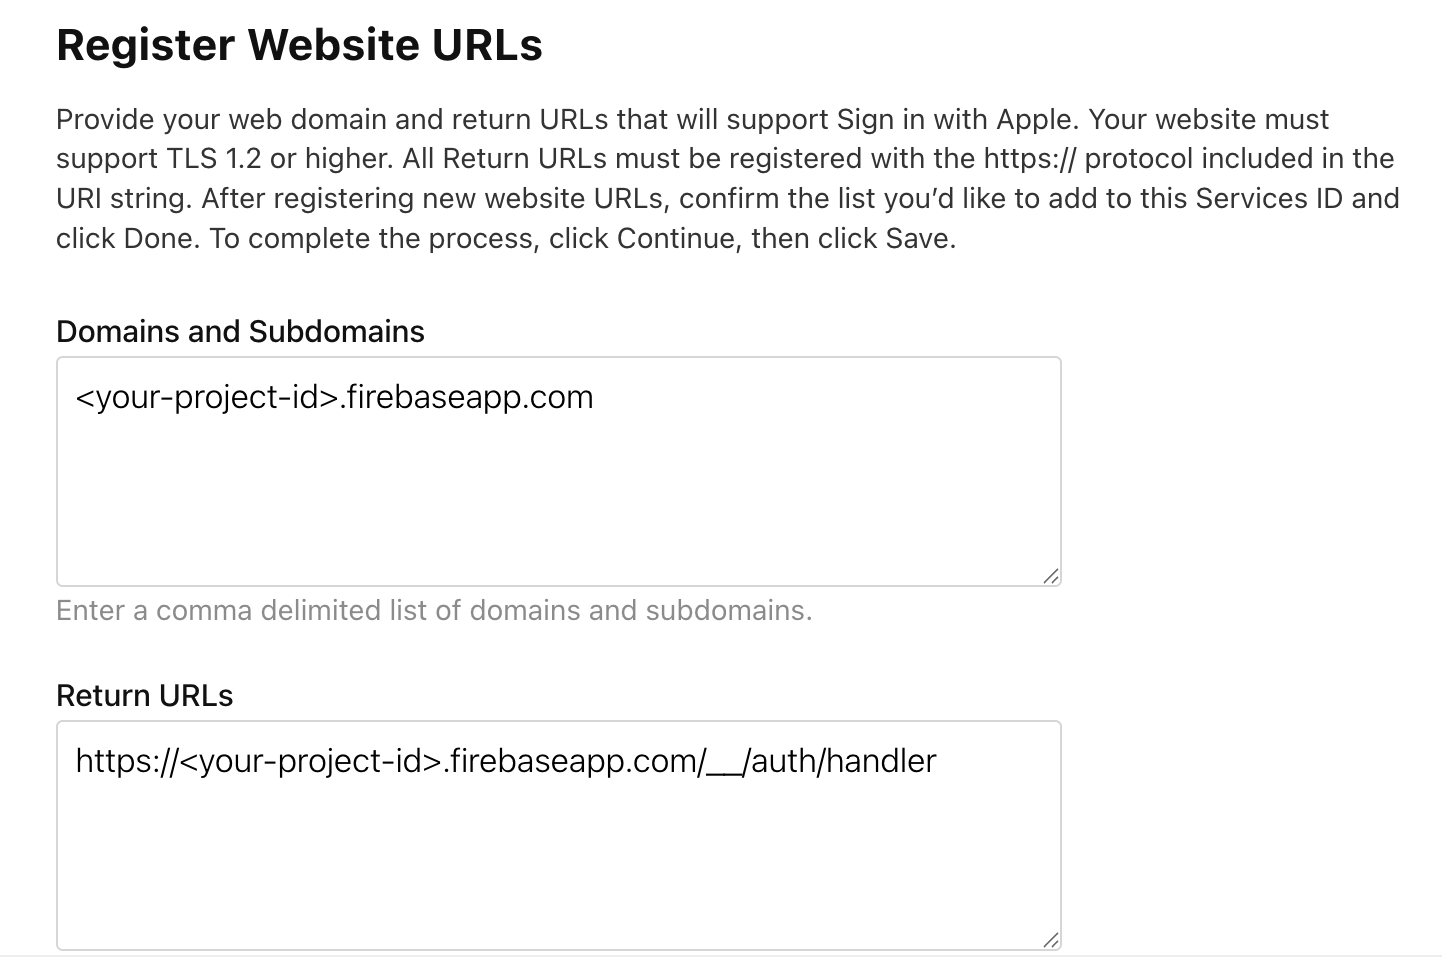
https://<your-project-id>.firebaseapp.com/__/auth/handle
步驟 3:建立 Key(.p8 金鑰,後端驗證用)
- 在 Keys 頁面新增一組 Key
- 勾選「Sign In with Apple」並設定 Primary App ID
- 下載 .p8 金鑰檔案(📌 只能下載一次,請妥善保管)
- 記錄 Key ID
步驟 3:儲存設定
確認所有欄位填寫無誤後,點擊「儲存」。Firebase Console 中 Apple 的狀態會變為「已啟用」,代表設定完成。
完成以上前置準備之後,我們需要針對各平台進行簡單設定。
Flutter 專案建置
首先我們要進行套件的安裝,在 Sign in with Apple 的部分我們使用社群維護的 sign_in_with_apple 套件,它同時支援 iOS 與 Android,並且對 Apple 的原生 API 做了良好的封裝。
如果你也跟我一樣選擇使用 Firebase Authentication,那還會需要將你的 Flutter 專案與 Firebase 雲端服務連結,這個部分可以參考 Flutter 搭配 FCM 打造極簡「無伺服器」聊天室 所提到的建置步驟,只需要將安裝的套件變更為此次的目標即可!
那我們就在 pubspec.yaml 加入本次所需的套件:
dependencies:
  firebase_core: ^x.x.x
  firebase_auth: ^x.x.x

  sign_in_with_apple: ^x.x.x
  crypto: ^x.x.x   # 用於產生 nonce 雜湊值
然後執行:
flutter pub get
iOS 平台設定
- 開啟 Xcode,選擇專案的 Runner Target
- 點擊「Signing & Capabilities」
- 點擊左上角「+ Capability」
- 搜尋並加入「Sign In with Apple」
Android 平台設定
使用 Firebase Authentication 後,Android 就不需要自建後端來處理 OAuth 回調,Firebase SDK 會自動開啟 Custom Tabs 完成 Web OAuth 流程,並將授權結果直接回傳給 App。
設定 1:確認 INTERNET 權限
開啟 android/app/src/main/AndroidManifest.xml,確認已有網路權限(Flutter 專案通常預設已加入):
<uses-permission android:name="android.permission.INTERNET" />
設定 2:移除 android:taskAffinity <‼️ 這步非常重要>
Firebase 使用 Custom Tabs 開啟瀏覽器讓使用者完成 Apple 登入,登入完成後需將控制權交還給 App。
若 <activity> 設定了 android:taskAffinity,會導致 Custom Tabs 無法正確把焦點交還,造成畫面卡住或登入流程中斷。
請找到 AndroidManifest.xml 中的主要 <activity> 標籤,將 android:taskAffinity 這行移除:
<!-- 修改前(有 taskAffinity 可能導致轉導失敗)-->
<activity
    android:name=".MainActivity"
    android:taskAffinity=""
    android:launchMode="singleTop"
    ... >


<!-- 修改後(移除 taskAffinity)-->
<activity
    android:name=".MainActivity"
    android:launchMode="singleTop"
    ... >
完成這兩項設定後,Android 端就準備好了,不需要額外建立後端服務或設定 WebView。
核心程式碼實作
在 UI 中加入 Apple 登入按鈕
sign_in_with_apple 套件提供了符合 Apple HIG(Human Interface Guidelines)規範的官方樣式按鈕(也可以按照自己的 UI 風格製作符合 Apple HIG 的按鈕):
import 'package:flutter/material.dart';
import 'package:sign_in_with_apple/sign_in_with_apple.dart';

class LoginPage extends StatelessWidget {
  const LoginPage({super.key});

  @override
  Widget build(BuildContext context) {
    return Scaffold(
      body: Center(
        child: Padding(
          padding: const EdgeInsets.all(24.0),
          child: Column(
            mainAxisAlignment: MainAxisAlignment.center,
            children: [
              const Text(
                '歡迎使用',
                style: TextStyle(fontSize: 24, fontWeight: FontWeight.bold),
              ),
              const SizedBox(height: 48),
              // Apple 官方樣式按鈕
              SignInWithAppleButton(
                onPressed: () async {
                  await signInWithApple();
                },
              ),
            ],
          ),
        ),
      ),
    );
  }
}
執行 Sign in with Apple 登入(Firebase)
由於 iOS 與 Android 平台的行為不同,建議用 Platform.isAndroid 區分兩種流程:
import 'dart:io';
import 'dart:convert';
import 'dart:math';
import 'package:crypto/crypto.dart';
import 'package:firebase_auth/firebase_auth.dart';
import 'package:sign_in_with_apple/sign_in_with_apple.dart';

Future<UserCredential?> signInWithApple() async {
  if (Platform.isAndroid) {
    return await _signInWithAppleAndroid();
  } else {
    return await _signInWithAppleIOS();
  }
}
iOS:使用 sign_in_with_apple 套件呼叫原生 Apple 授權介面,再將憑證交給 Firebase。在 iOS 我們需要使用到 Nonce,它是一個隨機字串,用來防止重放攻擊(replay attack)。
流程如下:我們產生一組原始 nonce(rawNonce),將其 SHA-256 雜湊後傳給 Apple;Apple 會把雜湊版嵌入 idToken。之後將 rawNonce 傳給 Firebase,Firebase 再次雜湊並比對,確保 token 未被竄改。
Future<UserCredential?> _signInWithAppleIOS() async {
  final rawNonce = _generateNonce();
  final nonce = _sha256ofString(rawNonce);

  try {
    final appleCredential = await SignInWithApple.getAppleIDCredential(
      scopes: [
        AppleIDAuthorizationScopes.email,
        AppleIDAuthorizationScopes.fullName,
      ],
      nonce: nonce,
    );

    final oauthCredential = OAuthProvider('apple.com').credential(
      idToken: appleCredential.identityToken,
      rawNonce: rawNonce,
      accessToken: appleCredential.authorizationCode,
    );

    final userCredential =
        await FirebaseAuth.instance.signInWithCredential(oauthCredential);

    // 第一次登入才有姓名,更新 Firebase displayName
    final givenName = appleCredential.givenName;
    final familyName = appleCredential.familyName;
    if (givenName != null) {
      await userCredential.user
          ?.updateDisplayName('$givenName $familyName');
    }

    return userCredential;

  } on SignInWithAppleAuthorizationException catch (e) {
    if (e.code != AuthorizationErrorCode.canceled) {
      print('Apple 登入失敗:${e.message}');
    }
    return null;
  } on FirebaseAuthException catch (e) {
    print('Firebase 登入錯誤:${e.code} - ${e.message}');
    return null;
  }
}

/// 產生隨機 nonce 字串
String _generateNonce([int length = 32]) {
  const charset =
      '0123456789ABCDEFGHIJKLMNOPQRSTUVXYZabcdefghijklmnopqrstuvwxyz-._';
  final random = Random.secure();
  return List.generate(length, (_) => charset[random.nextInt(charset.length)])
      .join();
}

/// 將 nonce 進行 SHA-256 雜湊
String _sha256ofString(String input) {
  final bytes = utf8.encode(input);
  final digest = sha256.convert(bytes);
  return digest.toString();
}
Android:直接使用 Firebase 的 signInWithProvider(),由 Firebase 開啟 Web OAuth 流程,不需要額外套件或 nonce 處理。
Future<UserCredential?> _signInWithAppleAndroid() async {
  try {
    final OAuthProvider oAuthProvider = OAuthProvider('apple.com');
    oAuthProvider.addScope('email');
    oAuthProvider.addScope('name');

    final userCredential =
        await FirebaseAuth.instance.signInWithProvider(oAuthProvider);
    return userCredential;

  } on FirebaseAuthException catch (e) {
    print('Firebase 登入錯誤:${e.code} - ${e.message}');
    return null;
  }
}
關鍵差異說明:
- Android(signInWithProvider):Firebase 自動處理 Web OAuth 完整流程,包含開啟瀏覽器、接收回調、驗證 token,你只需要指定 provider 與 scope 即可,不需要手動處理 nonce。
- iOS(signInWithCredential):由 sign_in_with_apple 呼叫系統原生 Apple 授權介面(Face ID / Touch ID),需要手動產生 nonce 並傳入 rawNonce 給 Firebase 驗證。
- 兩種方式最終都會回傳 UserCredential,後續邏輯完全相同。
提醒
email 和 fullName 只有第一次登入才有,有需要的朋友記得先儲存!
監聽登入狀態
我們還可以透過 Firebase Auth 的 authStateChanges() 串流來監聽使用者的登入/登出狀態:
StreamBuilder<User?>(
  stream: FirebaseAuth.instance.authStateChanges(),
  builder: (context, snapshot) {
    if (snapshot.connectionState == ConnectionState.waiting) {
      return const CircularProgressIndicator();
    }
    if (snapshot.hasData) {
      // 使用者已登入
      return const HomePage();
    }
    // 使用者未登入
    return const LoginPage();
  },
)
恭喜你!你已經知道如何在 Flutter 中實作 Sign in with Apple,並且涵蓋了 iOS 與 Android 兩個平台。如果你有任何問題,歡迎留言討論!